
The temperatures are getting warmer by the day! Its time I share the 3 simple ways to get your garden ready for spring!
I can not wait to see our little brown patch of garden turn into a beautiful green paradise this season! Using these 3 simple ways to get your garden ready for spring, all you need is a little time each day in your garden.
There is no need to spend hours a day toiling over your soil, friends!
I have been learning a lot about stewardship and what it means to truly care for what you have been given.
To me, stewardship of our garden looks like taking a little time each day to check in on it. I lovingly take our kitchen compost scraps to the compost pile, check for any little weeds popping up and then enjoy the suns warmth and notice what areas get the most shade and sun.
Taking this approach to gardening has really lessened the amount of anxiety I used to get about the list of steps it would take to get to the end goal of a lush green food forest.
By doing these 3 simple steps a little bit at a time, I actually enjoy getting the garden ready! There is no more procrastination, I am actually planting things earlier this year instead of way too late!
I hope you keep reading and maybe see how this simple method can help take some of that mental stress off of your mind of having yet “another thing to get done“.
*As an Amazon associate, I earn a commission from qualifying purchases. This post contains affiliate links which will not charge you extra but will help me out by sharing a small commission so that I may continue to run this blog, read more about my affiliates disclosure here.
What are the 3 simple ways to get your garden ready for spring?
Step one is to amend your soil.
It is important to replenish the soil in your garden. Any plants that you had growing in your garden previously will have zapped your soil of precious minerals and nutrients.

Adding composted kitchen scraps to your soil will do just that! We keep this handy little stainless steel compost bucket on the counter next to the sink. It comes with charcoal filters, so there’s no smell. And it’s stainless steel so it washes clean very easily.
As I cook meals, I add any plant based food scraps right to that bin. When its full (usually at the end of the day) I empty it into our compost pile in the garden. The compost sits, we occasionally mix it and then scrape the finished rich compost from the bottom for use!
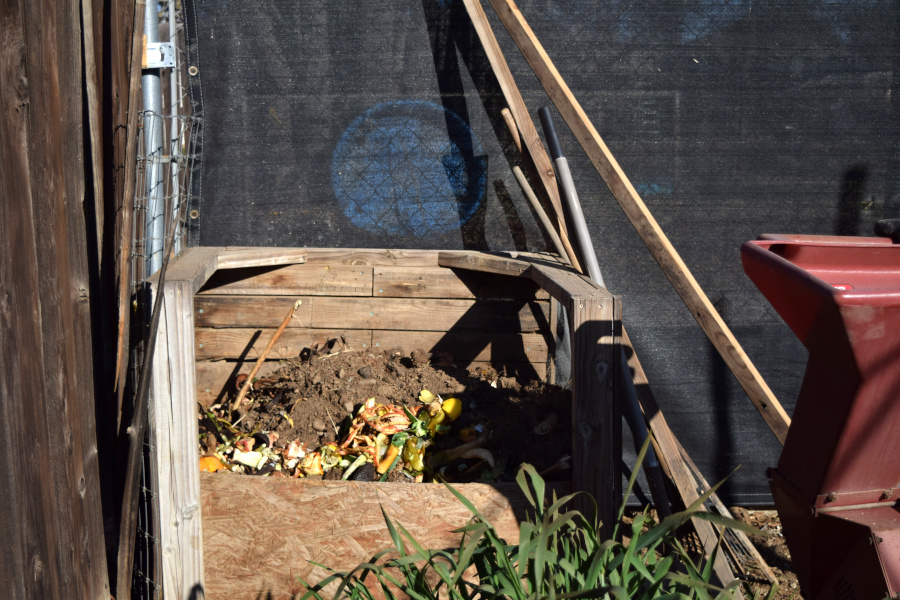
If you don’t have a compost pile for your garden then it would be wise to head to your local nursery and purchase a load of compost. But you should really start a compost pile! Its easy and free compared to purchasing a load from the nursery!
For us, I end up amending the soil for different rows at different times of the season. I don’t like to leave a bare row for too long, I want all those good nutrients to stay in the soil and be useful!
So, amending the soil before spring time may look like adding it to one row today, because it is the only row without a current cover crop growing in it. I’ll open the row, add the compost, close it back up and then in a week or so, add some seeds or plants to it. The whole process takes maybe 20 minutes.
When I am ready to plant in the other rows that have cover crops, I will pull the cover crops, add them to the top of our compost pile and then fill in those open spaces with more finished compost. There’s no need (for us anyways) to spend hours getting it all done at the same time.
Step two is managing the weeds!
After a long winter season, we usually have lots of grass and weeds growing in the garden plus left over fall crop plants wilting away in our rows.
You don’t want any weeds competing with your precious seedlings for nutrients or even choking them out completely. So it is best to keep the weeds to a minimum in your garden.
You can pick a day to spend hours doing this, or you can just do little by little each day!
My choice is to just pull up the weeds anytime I am out in the garden. Which turns out to be about every other day because our kitchen scraps need to be emptied into the compost pile.
Seriously, I just take less than 5 minutes a day to pull little weeds here and there and the garden looks great with minimal effort!

Another great way to help keep the weeds down is using mulch! Brian shreds any scrap wood we have around the yard and then we distribute it through our walking areas in the garden.

I like to use the mulching method because it preserves the lower layers of dirt instead of pulling everything in the walking area, which would sort of become a dry and sterile wasteland. We don’t want that for any part of the garden!
Step 3 is to make garden plans!
This is the fun part, you get to really put all your work and future garden plans onto paper!
Now, look up your hardiness zone by typing in your zip code and “hardiness zone” into the search bar of your web browser. You should get a number, ours is 9b. And then from there you can search “( your zone) planting calendar”.
Using a planting calendar is a great visual aid to see when and what you can plant in your garden.
Now that you know what can plant for your zone and season, its time to put together a template!
I like to start with a simple drawing of my garden. I include the rows and all planting areas that will be used for the season. Then I simply write in what I will be planting.
Keep in mind how much shade your garden will get! This includes shade from taller plants, then you can use that shade those taller plants give off to shade anything that needs only partial sunlight.
Why bother writing down where and what you’re planting?
You’re going to forget where you planted everything. No, trust me, you will.
And it’s great to use as a reference for the following year so you can look back and see what did or didn’t work.
Pin this for later

So there you have it, friends!
Getting your garden together for spring does not need to be a huge monumental task. Taking pride and stewardship over what you have, spend short amounts of time each day in your garden.
Add fresh scraps to your compost pile daily.
While you’re adding to your compost, look around and pull any little weeds you see.
Take notice of what areas get the most shade or are open to the elements and use that information to help plant your garden.
Happy Gardening!
I’d love to know how you prepare your garden for the coming season!
I’m so excited to get our spring garden growing! We’re expanding this year and these are good tops to help us stay on top of things!
Thank you! Yes, I am very excited to get our garden going this year too. 🙂
I found this helpful! We had a garden last year and it definitely stressed me out. I feel like you’ve simplified things. Thanks!
Yay! Glad I could help simplify things. Happy gardening 🙂